
In this article, I am going to write about the best and incredible feature of Skylum Luminar Neo that as an photo editor you should know. After reading this article, you are going to consider Skylum Luminar Neo as your photo editing software. Skylum Luminar Neo is great for both beginners to begin with and pro photo editors for their projects. It will quickly get you high quality results that you are looking for.
Easy To Use
Skylum Luminar Neo is very easy to use for beginners. You can use this program with some basic knowledge of photo editing. You will get pretty good results very quickly. Even, if you don no have any basic knowledge or experience, you can learn from built-in tutorials present is the program. You just have to dive in and start experimenting.
Inexpensive Forever Option
Skylum Luminar Neo provide you a life time option to buy it and it is a great deal. You don not have to worry about monthly payments anymore. This program is fantastic photo editor with a lot of great benefits. You can also get discount through promo offers.
Advanced AI Techniques
As an photo editor, you must take advantage of advanced AI editing techniques and tools. You can change or manipulate sky of image in one click. It can to incredible stuffs like one click swaps to masking. Skylum Luminar Neo had made difficult task a lot easier that results will blow your mind. This technology has constant updates and improvement that is getting better and better with the passage of time. You can use Skylum Luminar Neo built in ai feature for better and unique results of your photograph.
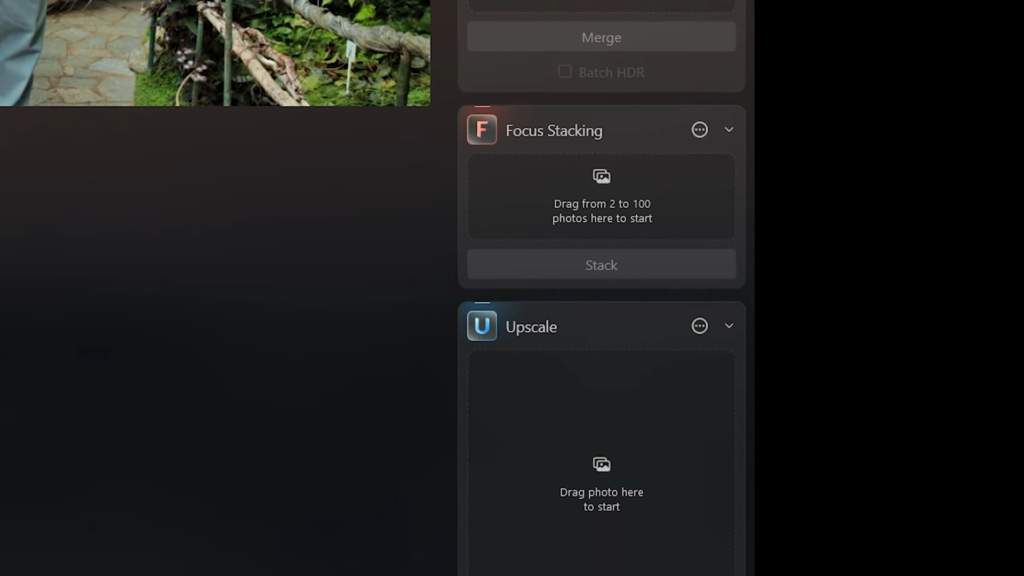
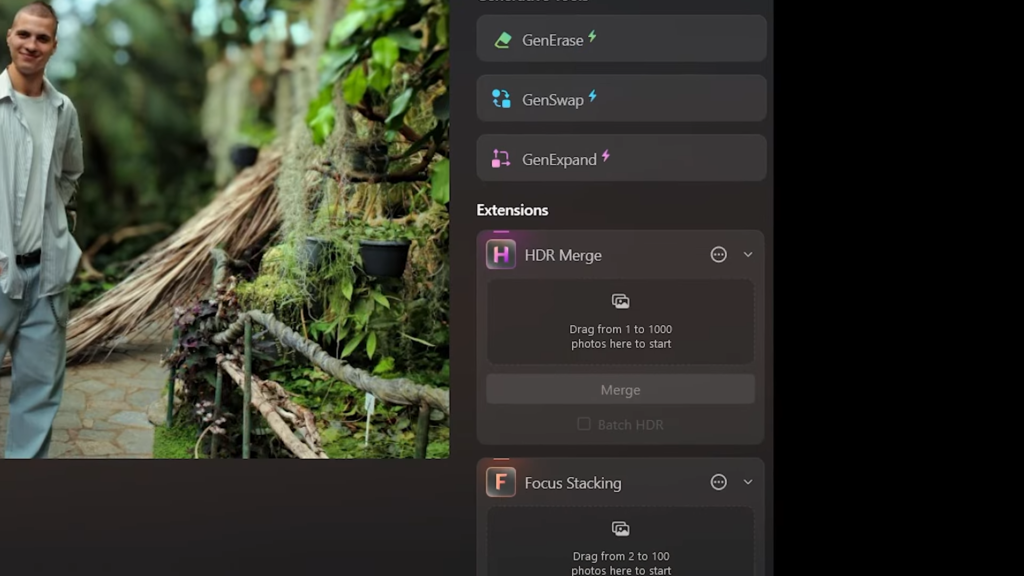
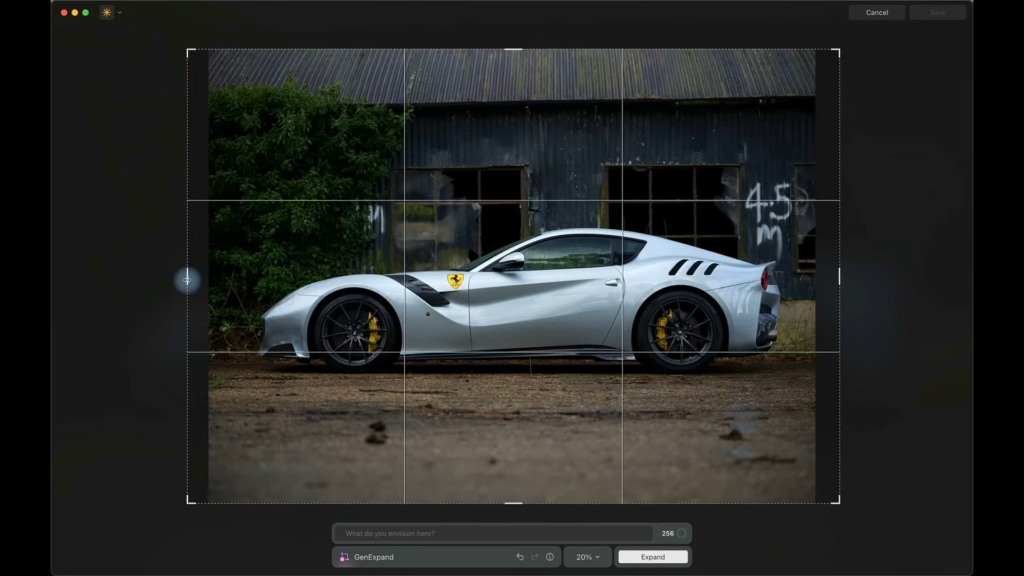
So Many Increadible tools
Skylum Luminar Neo contains a huge variety of tools and assets. It contain a lot of assets like skies presets, background presets etc. This feature makes Skylum Luminar Neo all in one program for all photo editors. It contain AI powered tools that you have to purchase these tools if you are working on Skylum Luminar Neo rival photo editing software. These tools are HDR Merge, GenErase, GenExpand, GenSwap, Upsclae, Focus Stacking and Pananorma Stitching. These tools are really handy for any photo editor and hence they had proved there worth.
Raw Photo Support
This ability of Skylum Luminar Neo provide incredible help for photo editors. This feature provide a lot of flexibility tp photo editor that you can edit your raw photographs any time. It enables you to change details even you have exported the final edited photograph.
Transform Your Travel Photos into Dramatic Masterpieces with Luminar Neo
We’ve all been there: you snap a photo during your travels, only to realize later that it looks flat, dull, or just… meh. But with a few strategic edits, even the most uninspiring shots can become jaw-dropping works of art. Take this photo I captured in Japan, for example. The original lacked depth and mood, but by applying some key principles of dramatic editing, I transformed it into a striking image brimming with contrast and emotion.
Whether you’re using Luminar Neo, Lightroom, Photoshop, or another editing tool, the fundamentals of dramatic photo editing remain the same. Let’s dive into the process step by step and yes, I’ll show you the exact techniques I used for my Japan photo, plus examples from Egypt and Menace to prove these methods work universally.
What Makes a Photo “Dramatic”?
Before we jump into editing, let’s break down the hallmarks of dramatic imagery: Contrast: Deep shadows, bright highlights, and rich blacks create visual tension. Color Grading: A cohesive color palette sets the mood (think moody blues, fiery reds, or earthy tones). Texture & Structure: Enhanced details add grit and dimension.
Composition: Guiding the viewer’s eye through light, shadows, and framing.
Step 1: Start with a Strong Foundation (Cropping & Straightening)
Even the best edits can’t save a poorly composed photo. My Japan shot initially looked “like a rushed snapshot” (let’s be honest). Cropping tighter and straightening the horizon instantly added balance. Pro tip: Don’t be afraid to cut distractions focus on your subject or focal point.
Step 2: Play with Light & Shadow
Drama thrives on contrast. Here’s how to nail it:
Drop the Shadows: Deepen dark areas to add mystery.
Boost Highlights: Make light sources or bright elements pop.
Adjust Blacks & Whites: Slide blacks left for richness, and nudge whites right for luminosity.
In my Japan edit, this step alone transformed a flat sky into a brooding backdrop.
Step 3: Guide the Viewer’s Eye with Vignetting
A subtle vignette darkens the edges of your photo, naturally drawing attention to the center. In Luminar Neo, use the Vignette tool; in Lightroom, try the Effects Panel. For extra impact, brighten the center slightly this mimics the human eye’s tendency to focus on well-lit subjects.
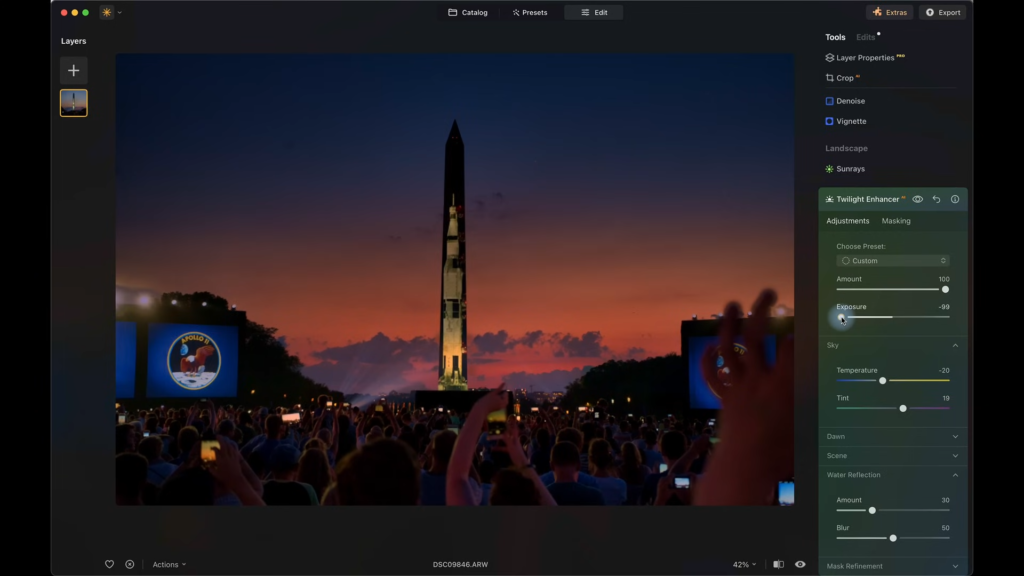
Step 4: Color Grading for Mood
Color sets the emotional tone. My Japan scene had too much cool blue in the shadows, clashing with the warm reds of the temple. Using HSL sliders (Hue, Saturation, Luminance), I: Reduced blue saturation to mute distractions.
Boosted reds and oranges to emphasize the traditional architecture. Why this works: Harmonizing colors creates cohesion. For Egypt’s desert shot, I leaned into amber tones to amplify the heat, while a Menace cityscape got a monochrome-blue treatment for an eerie vibe.
Step 5: Add Grit with Texture & Structure
Dramatic photos often feel tactile. Use: Clarity/Structure Sliders: Enhance mid-tone contrast to highlight details like stone, fabric, or foliage. Texture Tools: Sharpen fine elements without overdoing noise. In my Japan edit, boosting structure made the temple’s wooden beams and roof tiles stand out, adding depth.
Step 6: Walk Away, Then Refine
Editing fatigue is real. After applying these steps, take a break. Return with fresh eyes to tweak: Is the contrast too harsh? Are colors balanced? Does the vignette feel natural? For my Egypt photo, I initially overdid the shadows. Stepping back helped me find the sweet spot between drama and realism. Avoid the “Rabbit on the Motorway” Effect It’s easy to go overboard. Ask yourself: Does the edit serve the story, or is it just “noise”? Are highlights blown out or shadows crushed? Does the color grade feel intentional or chaotic?
Final Results: Before & After
Japan: A dull temple snapshot became a moody, red-hued scene with haunting shadows.
Egypt: A washed-out desert gained golden-hour warmth and striking rock textures.
Menace: A crooked, poorly lit cityscape turned into a dynamic, tilt-shifted masterpiece.
Transform Your Landscape Photos into Dramatic Masterpieces with Luminar Neo
If you’ve ever stared at a lackluster landscape photo and thought, “This could be so much more,” you’re not alone. Editing is where the magic happens where dull shots evolve into fantastical scenes that ignite the imagination. In this guide, we’ll walk through how to breathe life into a seemingly lifeless image using Luminar Neo, turning a washed-out gondola snapshot into a dramatic, otherworldly vista. Whether you’re seeking inspiration or actionable tips, let’s dive into the creative chaos of transformative editing.
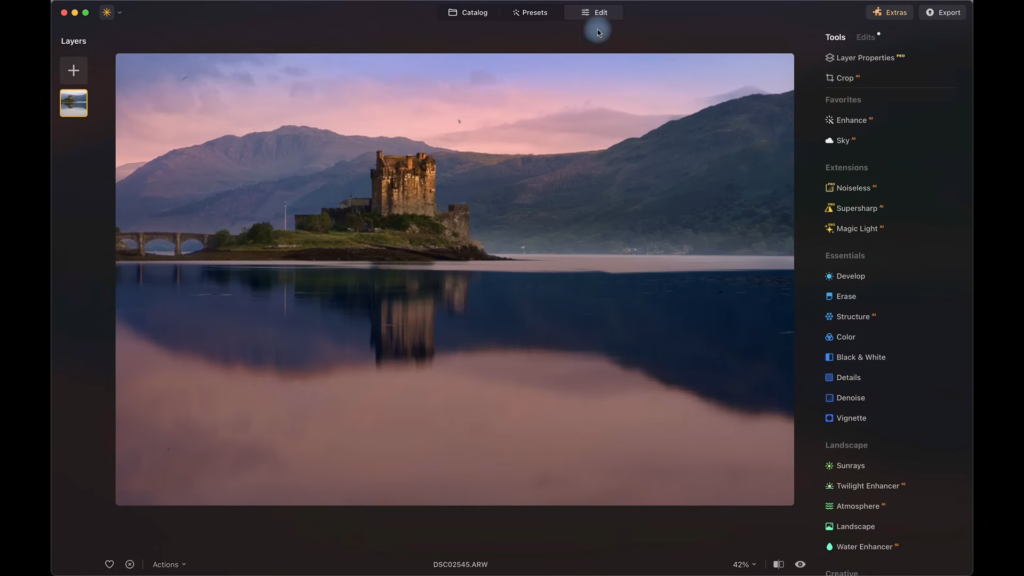
Setting the Scene: From Dull to Dramatic
The journey begins with a flat, overexposed image captured hastily from a moving gondola. The sky is washed out, the foreground feels empty, and the distant castle barely commands attention. But with Luminar Neo’s toolkit, even the most uninspiring photo can become a canvas for storytelling.
Step 1: Clean Up & Simplify
Start by decluttering. Use the Erase Tool to swiftly remove dust spots or distractions like those pesky sensor marks in the sky. A clean base ensures your edits shine.
Step 2: Direct the Viewer’s Eye
To highlight the castle and mountains, darken the foreground. This creates depth and contrast, pulling focus toward the scene’s hero: the distant architecture. Pro tip: Use Masking Tools or Adjustment Layers to selectively dim areas without affecting the entire image.
Color Adjustments for Mood
Color sets the emotional tone. Here’s how to shift from “meh” to mesmerizing: Cool It Down: Swap warm, muddy yellows for cooler blue tones. A quick tweak in the Temperature slider adds instant drama and a frosty, ethereal vibe. Boost Saturation: Amplify colors to make the landscape pop. The Accent AI Filter works wonders here, intensifying hues while smartly recovering details in overexposed skies. Go Darker (But Keep It Balanced): Use the Relight AI Filter to deepen shadows in the sky and foreground. This adds a stormy, cinematic feel.
Atmospheric Tweaks for Fantasy Flair
Now, let’s lean into the fantastical: Blend Distractions Away Foreground elements like trees can compete for attention. Apply a LUT (Look-Up Table) or Mood Filter to unify colors and soften details. This helps the eye glide toward the focal point the castle while adding a haunting, cohesive aesthetic.
Sun Rays & Golden Hour Magic
Why not invent your own light? The Sun Rays Tool lets you place artificial sunlight bursting through clouds. Position it behind the castle for a heavenly glow. Then, reintroduce warmth with Color Grading: blend gold and amber tones into the sunlit areas for a mystical, almost divine effect.
Polishing the Fantasy Vignettes & Subtle Drama
A subtle vignette darkens the edges of the frame, further centering attention. Adjust the Vignette Tool to avoid overly harsh transitions think “moody,” not “tunnel vision.”
Erase to Simplify
Less is often more. Use the Erase Tool again to remove lingering distractions in the foreground. A cleaner composition feels intentional and immersive.
Lens Flares: The Icing on the Cake
For a final touch of whimsy, add lens flares. Import a flare overlay (sourced from stock sites or created in-app), set the blend mode to Screen, and adjust opacity. This mimics light scattering through a camera lens, enhancing the dreamlike atmosphere.
Before & After: The Power of Editing
The transformation speaks for itself. What began as a bland, washed-out image now feels like a still from a fantasy epic stormy skies, golden light, and a castle that commands wonder. While the process might seem chaotic (no strict order here!), embracing experimentation is key. Every slider tweak and filter choice builds toward a unique vision.
Your Turn to Create
Editing is an art, not a science. Don’t fear the chaos let it guide you. Play with Luminar Neo’s tools, test bold adjustments, and remember: even “mistakes” can lead to happy accidents. Ready to turn your photos into dramatic masterpieces? Dive in, and watch your landscapes come alive.
Leave a Reply